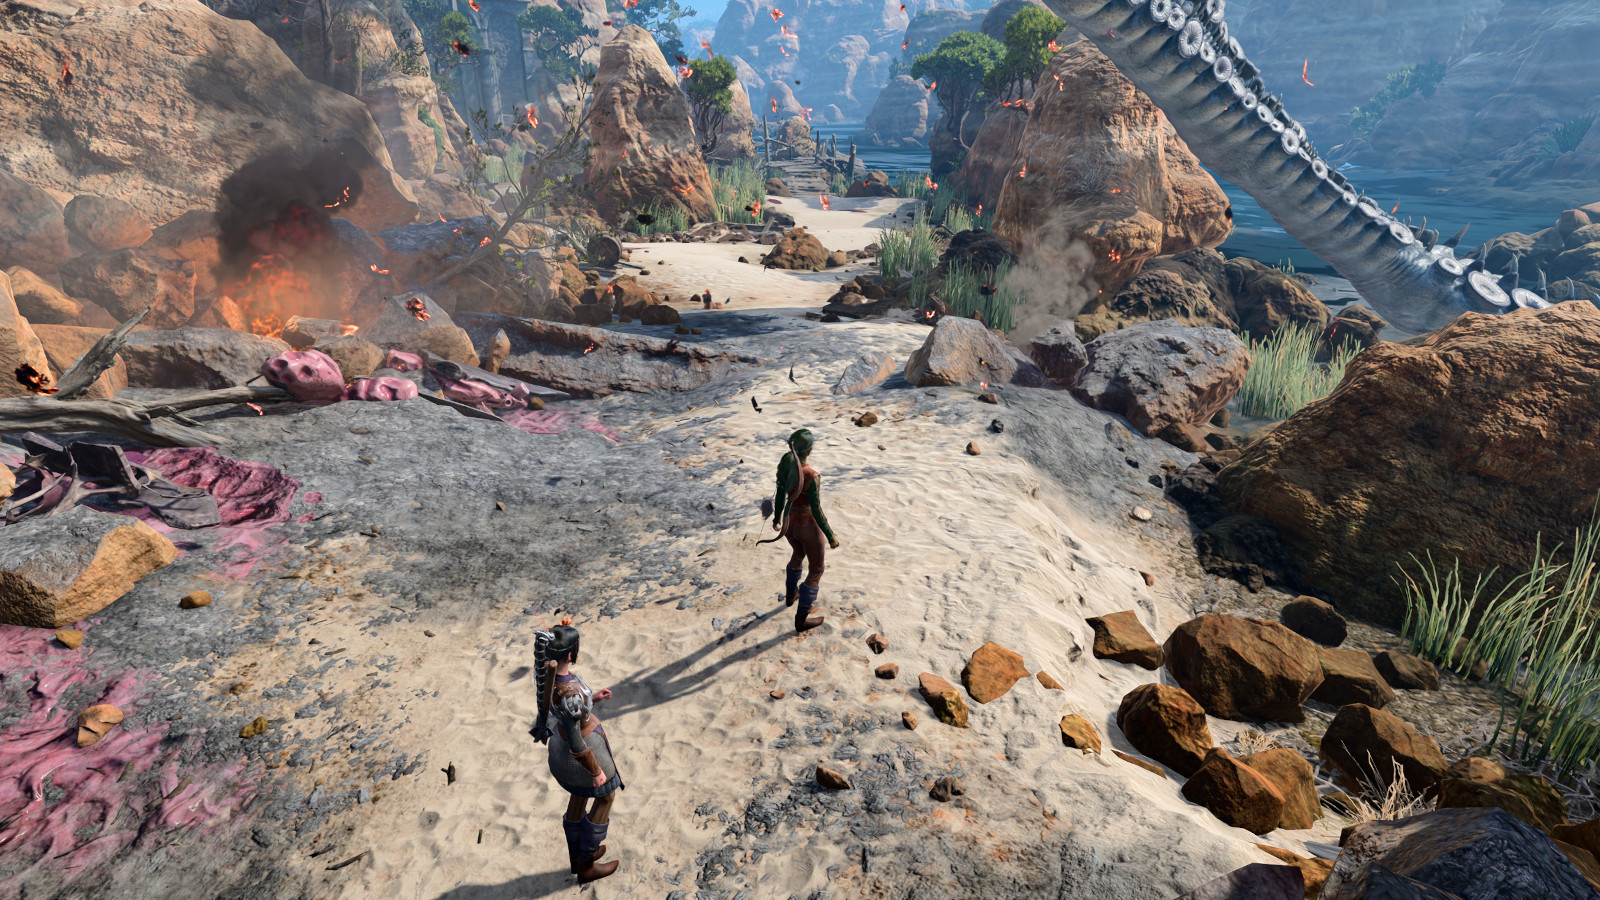
This area walkthrough will guide you from the crash site of the Nautiloid to the gates of the Emerald Grove. Along the way, you’ll meet a few potential companions plus a key NPC. This guide should help you find everything there is to find in Baldur’s Gate 3’s first open-world area.
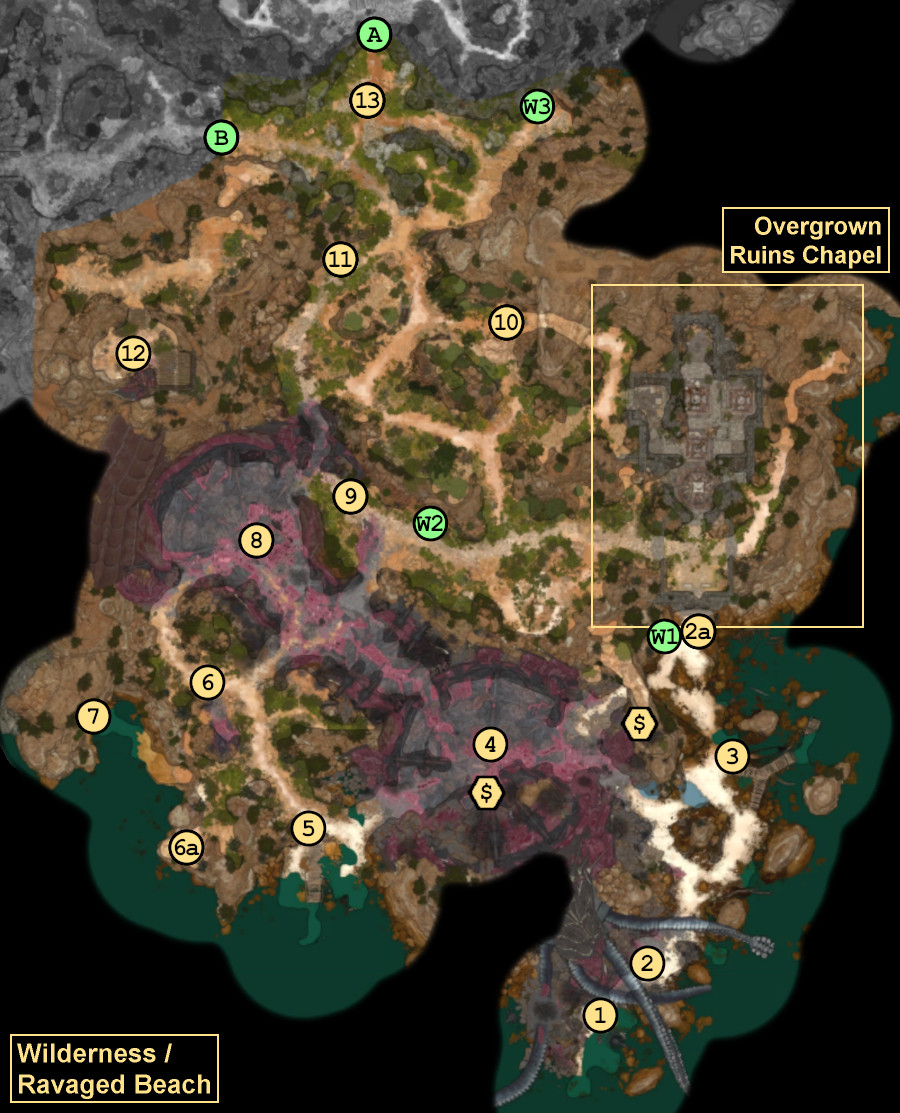
If you rescued Shadowheart from her pod on board the Nautiloid, then you’ll find her right next to your starting position (#2). Otherwise, she’ll be farther up the beach to the north (#2a). Either way, pick the conversation options where you agree to stay together. You’ll want Shadowheart‘s help in the combat encounters to come. Recruiting Shadowheart will trigger the quest Daughter of Darkness.
You’ll find a Perfumed Letter on the corpse here. If you read it, then you’ll learn that Anna and Sy were planning to run away together — only that’s not going to happen now, given that you looted the letter from Sy’s corpse. You won’t ever meet Anna — on the hill mentioned in the letter (#12) or anywhere else — so you won’t be able to tell her the bad news.
You’ll find a lot of documents like the Perfumed Letter in the game. They’re not involved in any quests, and they won’t lead to anything, but they’ll give you some extra background information about the area you’re in.
You’ll encounter three injured intellect devourers here. They’ll attack you when they spot you, so it’s best to sneak up on them. This will allow you to “surprise” them and get in a free round of attacks, making the battle against them much easier to win.
“You fight well. Perhaps our survival isn’t such a distant prospect.” — Shadowheart
At this spot, you’ll discover a cart with some spilled trunks and a crate. One of the trunks will be locked. Inside the crate, you’ll find Thieves’ Tools. This scene is set up for you to try out using the Thieves’ Tools on the trunk, but it’s not necessary. Breaking a container open (by force-attacking it with your weapon) won’t damage the contents. So you can just break the trunk to get it open, which will liberate a Leather Helmet and some gold. To pick the lock, you’ll have to beat a DC-5 Sleight of Hand check, but you’ll use up the Thieves’ Tools in the process.
At this spot (#6), you’ll meet the High ElfRogueAstarion, one of the game’s companions. He’ll try to convince you that there is an intellect devourer trapped in the bushes nearby, when really it’s just a boar. Whether you believe Astarion‘s ruse or not, you’ll end up in a scuffle, but regardless of what you say or do, your Illithid tadpoles will connect you, and Astarion will realize that you’re not working for the mind flayers. This will allow you to add him as a companion — and you should do so, especially if you don’t already have a Rogue in your squad. Recruiting Astarion will trigger the quest The Pale Elf.
Note: If you discover the boar during the encounter, then it will run away to the south (#6a). If you interact with it there, then it will run away again — and disappear from the game this time — even if you use Speak with Animals on it. Possibly this is supposed to be the same boar as the exsanguinated boar that you can randomly find in the Forest area, but that other boar will appear even if you kill this one.
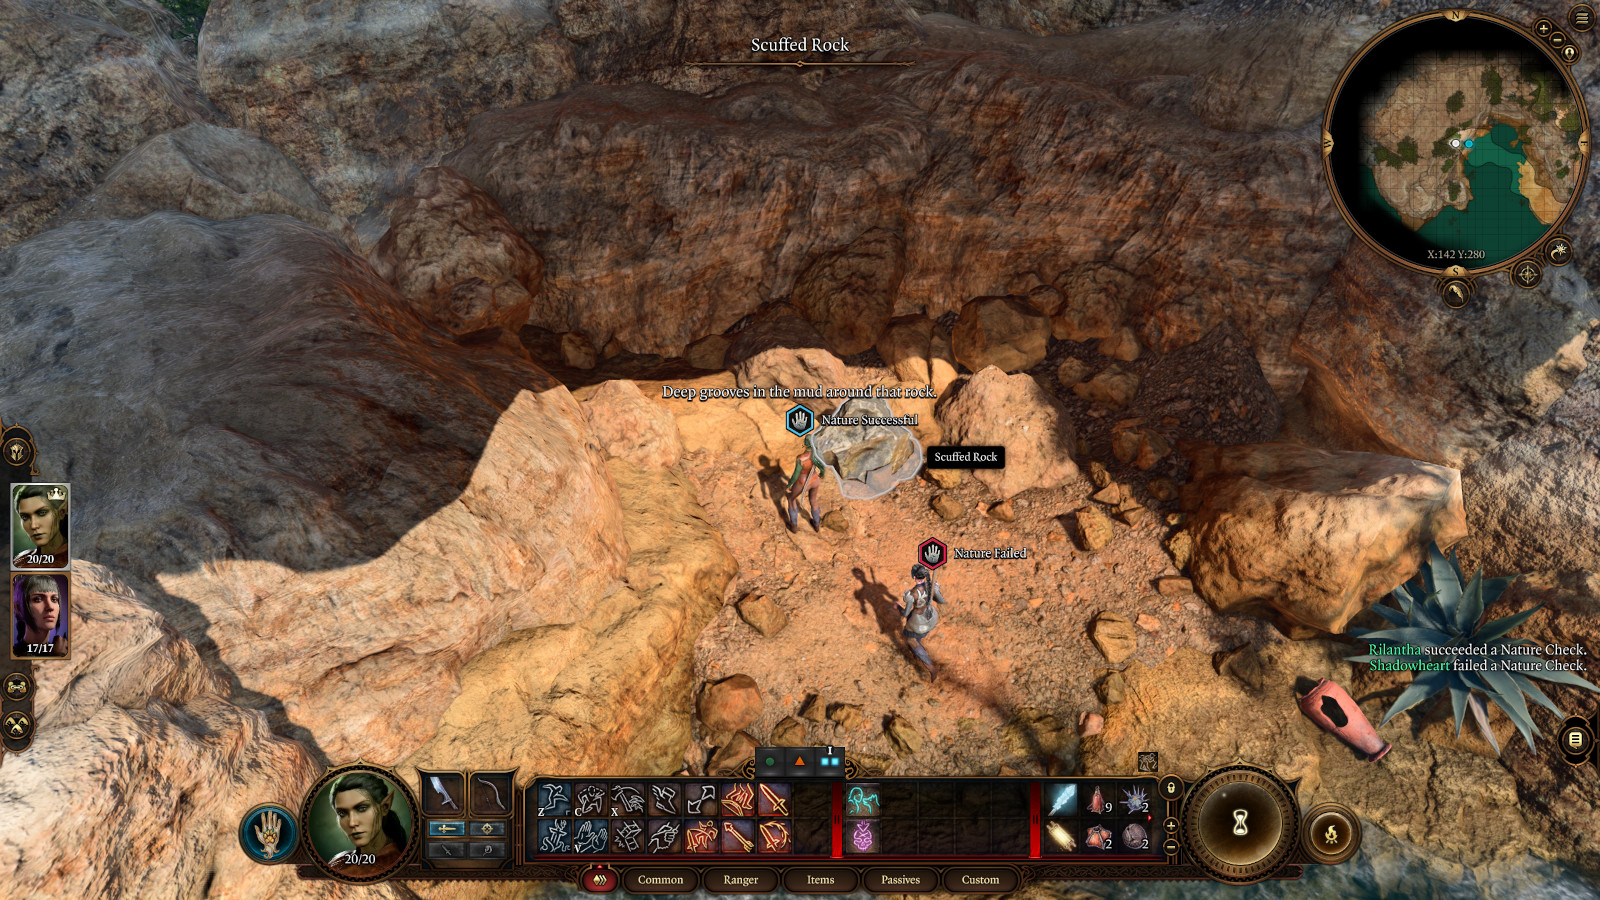
To reach the scuffed rock here, you’ll have to jump down to it from the path to the southeast. If you pass a DC-10 Nature check, then you’ll detect grooves in the rock, which will allow you to move it out of the way. Beneath the rock, you’ll discover an ornate chest containing a Harper’s Map, a Harper’s Notebook, and more. Reading the map will cause a “hidden cache” marker to appear over an abandoned Harper camp to the north (#12). When you eventually visit the camp, you’ll find a skeleton with a Silver Pendant.
Reading the Harper’s Map isn’t required for finding the abandoned Harper camp, so if you don’t detect the scuffed rock, you won’t lose anything.
You’ll encounter a dying mind flayer here. It’ll try to control your thoughts, but in its weakened state you should be able to resist it — unless you go out of your way to submit. If you kill the mind flayer, either through dialogue or by manually attacking it later, then you’ll earn 35 xp.
At this spot you’ll discover Lae’zel trapped in a cage, with the tieflings Damays and Nymessa trying to decide what to do with her. When you get close enough to the trio, you’ll automatically start a conversation with them. This will trigger the quest Free Lae’zel.
If you’re playing a Githyanki, then you’ll either have to attack the tieflings or pass a DC-5 Intimidation check to scare them away. Other races will get the three options listed below.
If you pass a DC-10 Deception check, then you’ll convince the tieflings to leave. But before they go, they’ll mention their camp. If you ask about healing and pass a DC-5 Persuasion check, then they’ll mention their healer Nettie, which will mark her location in the Emerald Grove to the north.
If you pass a DC-5 Persuasion check, then you’ll convince the tieflings to free Lae’zel and kill her. However, once Lae’zel is out of her cage, you’ll be able to choose whose side you want to be on. The only way to recruit Lae’zel is to take her side and attack the tieflings.
You can simply attack the tieflings.
If you didn’t convince the tieflings to free Lae’zel, then you’ll have to complete that task yourself by destroying the “weakened base” of her cage. If you somehow don’t have a ranged weapon for this, you’ll find a Shortbow on the ground nearby.
Once the tieflings are gone and Lae’zel is out of her cage, she’ll become available as a companion. If you recruit her, then you’ll trigger the quest The Githyanki Warrior.
Note: If you head to your camp before rescuing Lae’zel, then you’ll fail the quest Free Lae’zel, and Lae’zel will disappear from the game.
At this location, you’ll discover a dirt mound with a Shovel sticking in it. Most dirt mounds need to be detected (using Survival), but this one will start out visible. To dig up a dirt mound, you’ll just need to interact with it while having a Shovel in your inventory. When you dig up the dirt mound here, you’ll find a wooden chest containing some random loot.
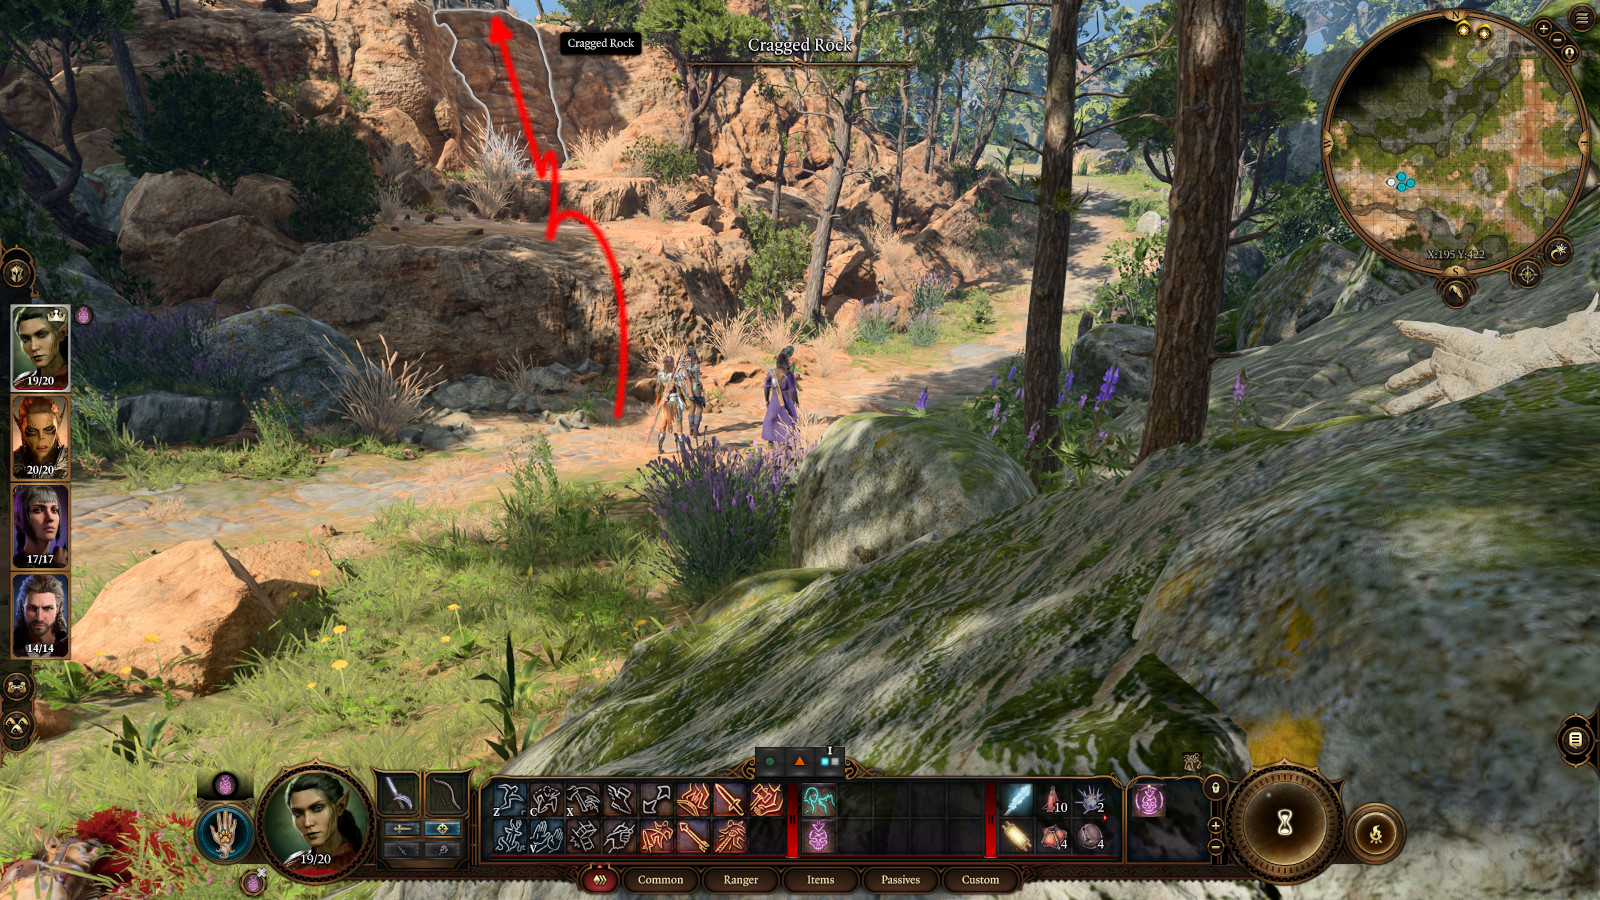
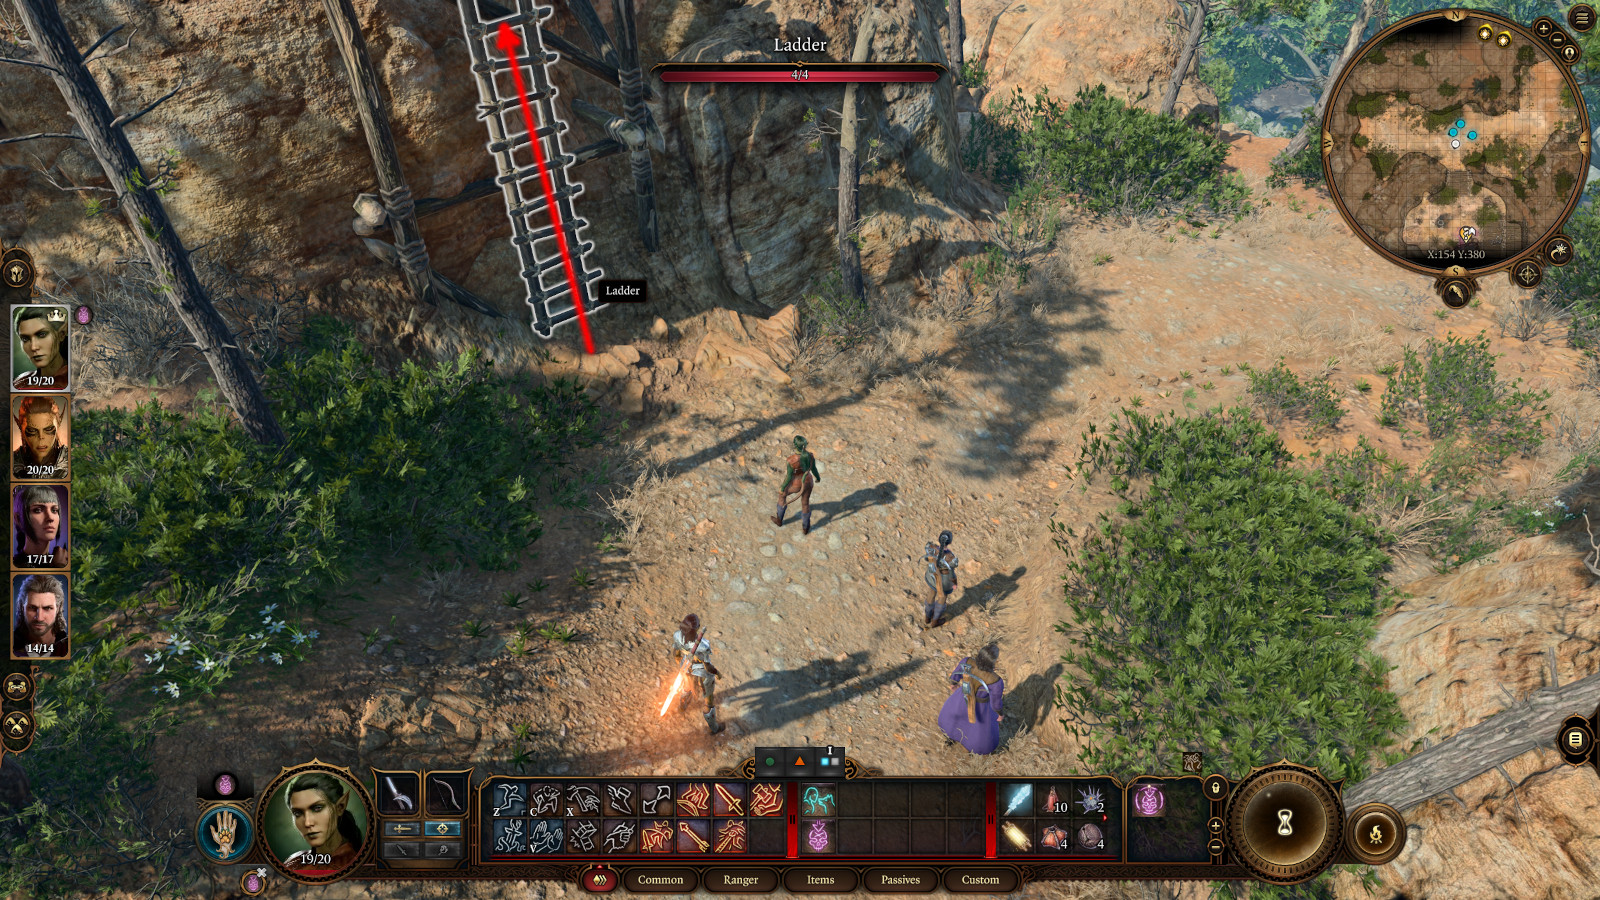
The abandoned Harper camp is located on the top of a high, rocky outcropping. To reach it, you’ll need to start on the path to the north and then do some jumping and climbing to reach it (as shown in the images above). This is the site pointed to by the Harper’s Map you might have found earlier (at #7).
Inside the camp, you’ll discover a skeleton carrying a Silver Pendant. If you pass a DC-12 History check when looting the pendant, then you’ll notice it “matches the sigils in that cave,” even though you probably won’t have found any caves yet. This is just an indication that the Harpers have been through the area. The pendant gives you the Guidance cantrip, which is useful for beating ability checks.
Also, on the western side of the camp, if you pass a DC-10 Perception check, then you’ll notice a rocky crevice inhabited by spiders. If you interact with the crevice and pass a DC-15 Animal Handling check (only DC-10 for Rangers) or a DC-15 Sleight of Hand check, then you’ll be able to grab a Pouch away from the spiders. Inside it, you’ll find a Spider Egg Sac and some gold.
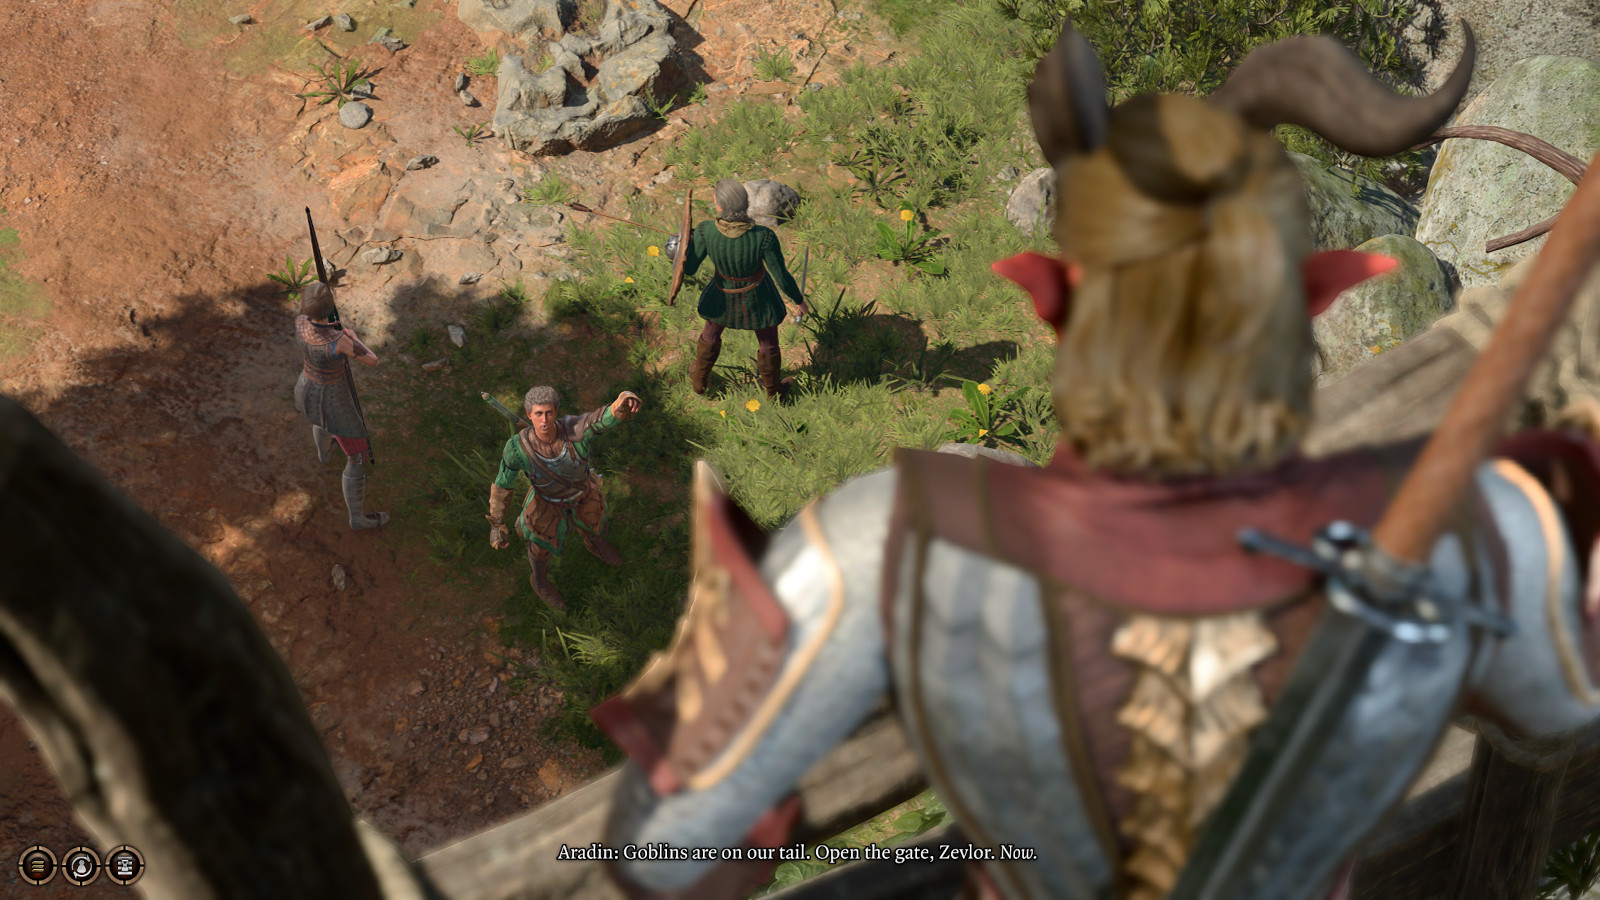
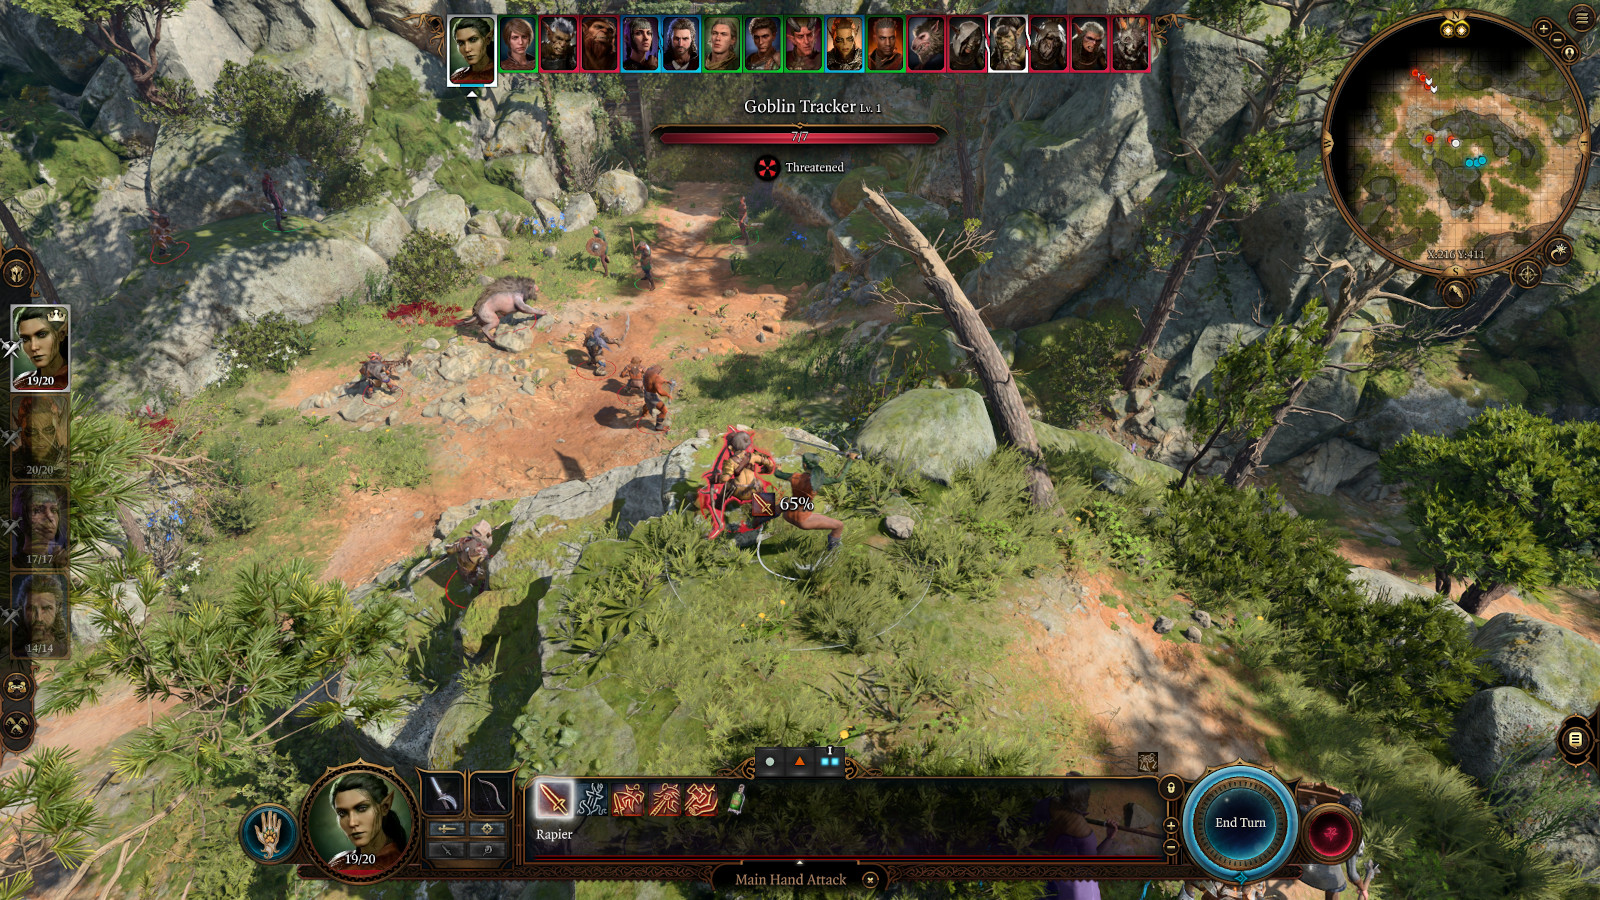
The first time you approach the entrance to the Emerald Grove (Exit A), you’ll witness a group of mercenaries led by Aradin demanding to be let inside. However, before the gate can be raised, a group of goblins will arrive, and you’ll get pulled into the battle. Luckily, between the mercenaries and the gate’s defenders — including the WarlockWyll, whom you’ll be able to recruit as a companion when you eventually make it into the grove — you’ll have plenty of help, and so the battle shouldn’t be too bad.
The goblin party is headed by a boss named Za’krug. It’ll also have a bugbear, a worg, and assorted others. The safest place for you to fight them is on the hill to the south of the battle. If you dispatch the two goblin trackers there, then the hill’s high ground will give you an advantage over the goblins below, and you’ll be able to pelt them with arrows and spells while the NPCs by the gate take the brunt of the damage. Afterwards when you loot the corpses, you’ll find Gloves of Power on Za’krug’s remains.
Note: If you keep all of the gate’s defenders alive, then Lae’zel should gain the inspiration No One Left Behind — but this apparently broke in Patch 6 and hasn’t been fixed.
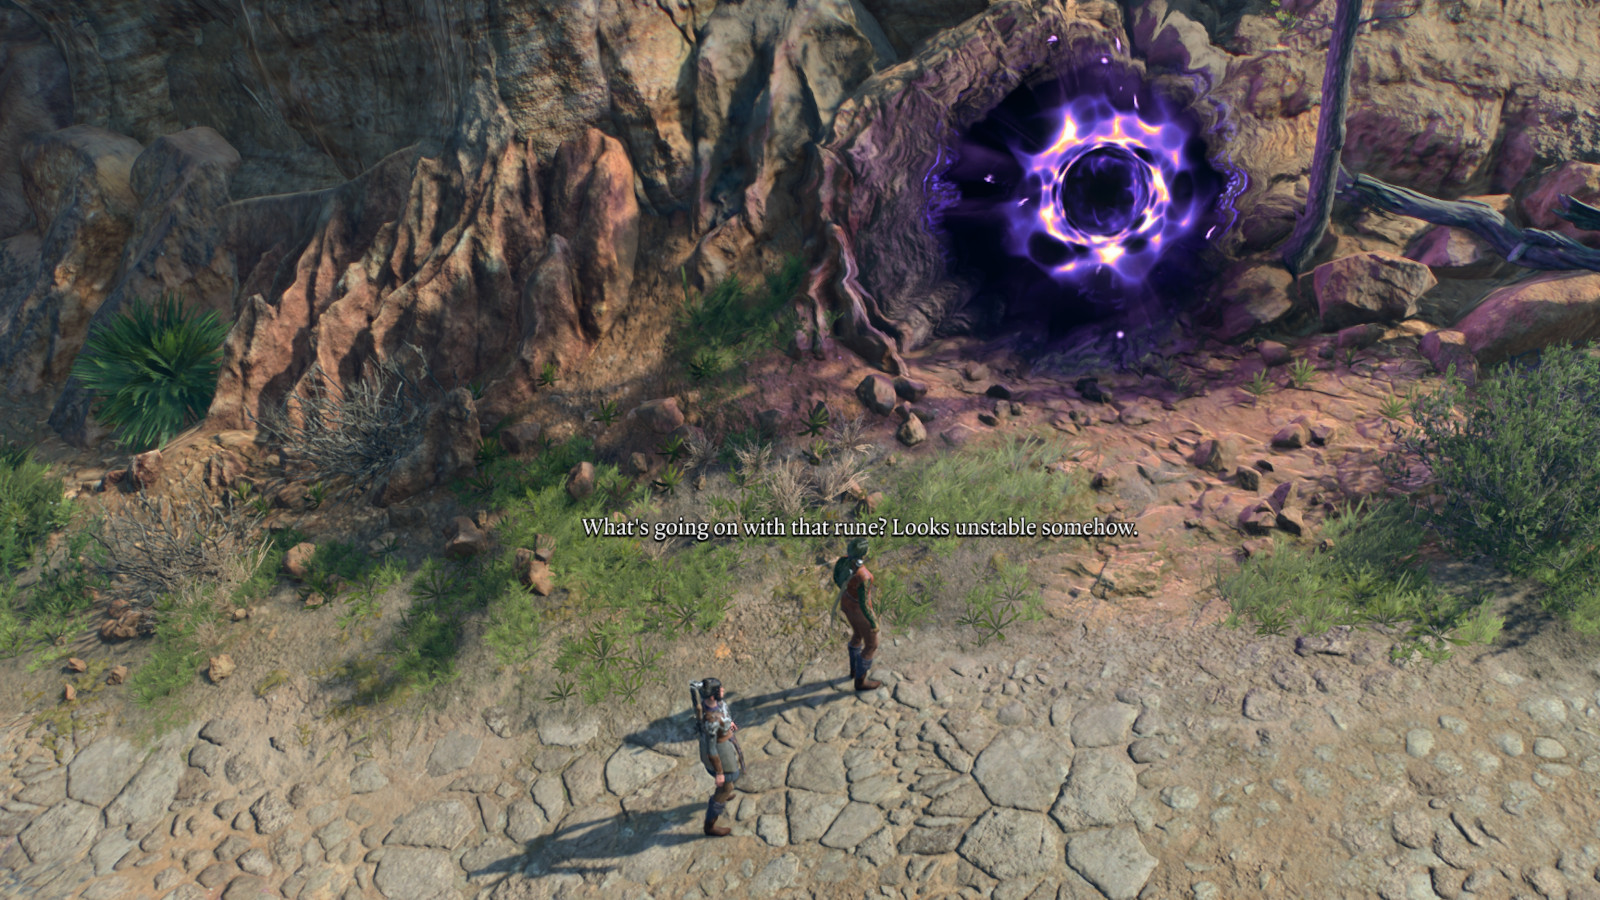
When you approach the Ancient Sigil Circle here, you’ll see that it’s behaving erratically. Then when you touch it, a hand will reach out of it. That hand belongs to the HumanWizardGale, a potential companion. To save Gale from his predicament, you’ll have a few options:
All classes get a pair of Strength checks at DC-7 and DC-12.
If you fail at a class-specific check, then you’ll still be able to try the Strength checks. If you’re successful with any check, then you’ll pull Gale free from the Ancient Sigil Circle, and he’ll become available as a companion. If you fail all of the available checks, then Gale will die and disappear from the game. Recruiting Gale will trigger the quest The Wizard of Waterdeep.
Note: Depending on your main character’s stats and class, you might be better off having Shadowheart interact with the Ancient Sigil Circle.
Another Note: After saving Gale, if you decide that you don’t trust him, and you kill him, then his corpse will begin emitting a necrotic aura, and a spectral version of Gale will appear and give you a convoluted set of instructions for how to resurrect him. If you follow these instructions correctly, then Gale will come back to life and stop emitting the aura, and he won’t hold it against you that you killed him, which means you’ll still be able to add him as a companion. The spectral Gale encounter will occur the first time Gale dies, here or elsewhere, so if you use Gale as a companion, then you’ll probably see it sooner or later.
After thoroughly exploring the Ravaged Beach and Wilderness, there are three places where you can go:
The Overgrown Ruins Chapel: This is a small area where you’ll meet Withers, who will move to your camp and allow you to revive dead characters, respec characters, and summon hirelings.
The Emerald Grove: Inside the grove, you’ll meet the druids who live there and the tieflings who are hiding there. This area will advance the main questline and give you a reason to visit the Blighted Village and Forest.
The Blighted Village and Forest: This is where you’ll start meeting the goblins who attacked Aradin at the gate. But they won’t necessarily attack you.
Starting with cassette tape games on the TRS-80, Steven has been playing, creating, and writing about games for a long, long time. This makes him experienced, not old. Lately, Steven has been focusing on walkthroughs, making sure everybody knows how to solve Towers of Hanoi puzzles.